
At a live virtual training we recently hosted, Bat Biologist and Co-Owner/Co-Founder of Edgewood Environmental Consulting Mike Fishman walked us through the process of conducting acoustic bat surveys, from pre-field planning through deployment, programming, and data collection.
While Mike’s presentation focused on presence/probable absence protocols for threatened and endangered species, these techniques can also be applied to bat research and other types of bat studies.
Read on for a checklist of things to keep in mind when deploying this field season!
Part 1: Preparing for Field Deployment
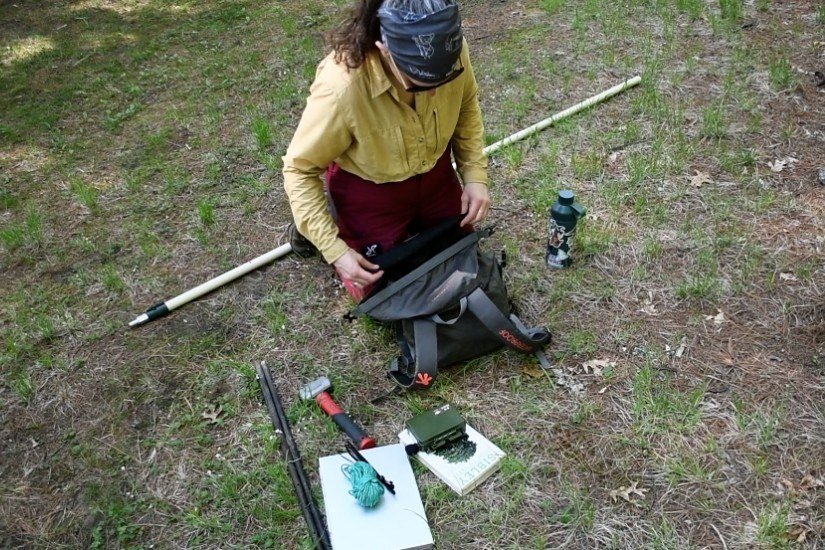
So, you’ve prepared a study plan, run it by the necessary officials, and received the necessary approvals. Now, you’re ready to go into the field! Before heading out, double-check that you have everything you need:
Bat Recorders: (This one seems obvious, but you’d be surprised!) Wildlife Acoustics offers two passive bat recorders: the Song Meter SM4BAT FS and the newer Song Meter Mini Bat 2. Both are exceptional ultrasonic recorders, capturing more bat calls and less unwanted noise, but they have distinct differences.
The SM4BAT FS is the larger of the two and can accommodate cabled microphones, connect to an external power source, or run on battery power. In contrast, the Mini Bat 2 is compact, lightweight, and can record for up to 125 ten-hour nights on battery power alone (not to mention it can also record wildlife that vocalizes within the typical range of human hearing).
If you’re unsure which option is best for your project, we’ve created a short quiz to help you make an informed decision.
- Ultrasonic Calibrator: A 40 kHz pure-tone generator to test microphone functionality during setup and retrieval. This is to verify (and document) that your microphone is working properly.
Memory Cards: For shorter deployments, consider 64–128 GB SD cards with high read/write speeds (e.g., SanDisk Extreme Pro) to reduce download times. For extended deployments (e.g., over two months) or if you are in an area with very frequent bat calls (e.g., inside a roost), you’ll want to use larger cards with slower read and write speeds.
Pro tip: When choosing a memory card, pay attention to its advertised upload and download speeds, and consider whether you prioritize quick data retrieval over battery-power savings or vice versa. A card with a fast download speed (e.g., 200 MB/s) can accelerate the data download process and may be a good option for shorter deployments. However, a slower card uses less power on average and is better suited for longer deployments.
- Batteries: Always use fresh batteries. This is critical because combining new batteries with used ones may cause them to leak corrosive chemicals and damage your recorder.
Mounting Gear: Bat recorders should be elevated three meters (10 feet) above the ground. Mike uses electrical metallic tubing with flagging tape for visibility and height verification, as well as zip ties for attachment—a rebar stake in the ground anchors the pole.
Or, if you prefer to use a tripod, the back of the Mini Bat 2 features a tripod-style threaded mounting point that can also accommodate accessories designed for mounting trail cameras and similar devices.

- Security Supplies: Cable locks to attach your recorder to a pole and/or padlocks for the enclosure itself to prevent unauthorized access. This is important if your recorder is located near a trail or other public-access area.
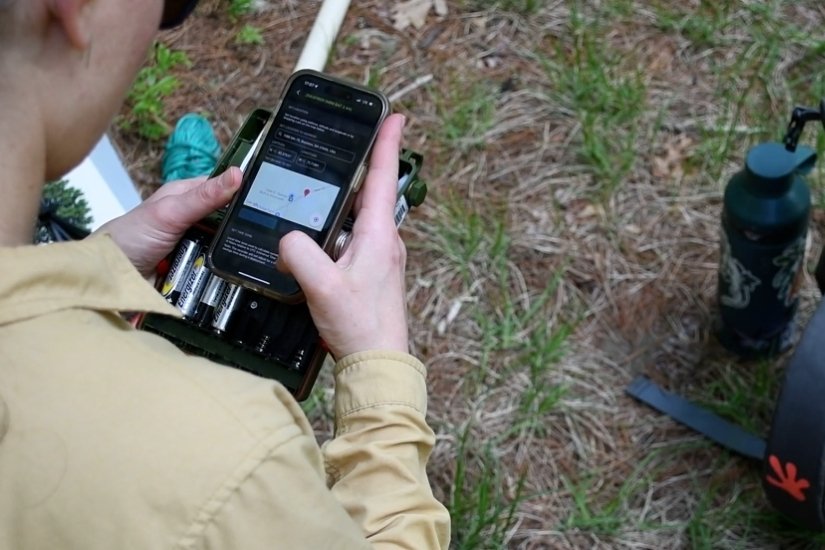
- GPS: For obtaining coordinates. A handheld unit is fine, or if you are using the Mini Bat 2, you can set coordinates using your mobile device’s GPS through the free Song Meter Configurator companion app. (Watch a brief video tutorial here; simply fast-forward to the 4:10 timestamp.)
- Documentation Tools: A camera for capturing protocol photos and a field notebook for taking detailed notes, such as where you were, what the local environment looked like, what cover types and tree species were around, the recorder’s distance to clutter, etc.
Smartphone or Tablet: For use when configuring a Mini Bat 2 via the Song Meter Configurator app. (A desktop version of the Configurator can be used to program the SM4BAT FS; however, you can use its built-in keypad and digital display to program–or make any last-minute changes to programming–in the field.)
- Safety Gear: Protective boots, high-visibility vests, and any other equipment necessary for your field site.
Part 2: Selecting Survey Sites
Proper placement of your equipment is key to capturing quality recordings:
Habitat Types: When planning your study, you mapped areas where bats are likely to move (e.g., roost trees, foraging and drinking areas, and travel corridors) to determine where to place your acoustic detectors.
Edge habitats, such as forest-marsh margins or along streams and ponds with surface vegetation (like duckweed or water lilies), are ideal deployment locations because they have fewer flat, smooth surfaces, like open water, that can cause echoes (more on this in a minute).
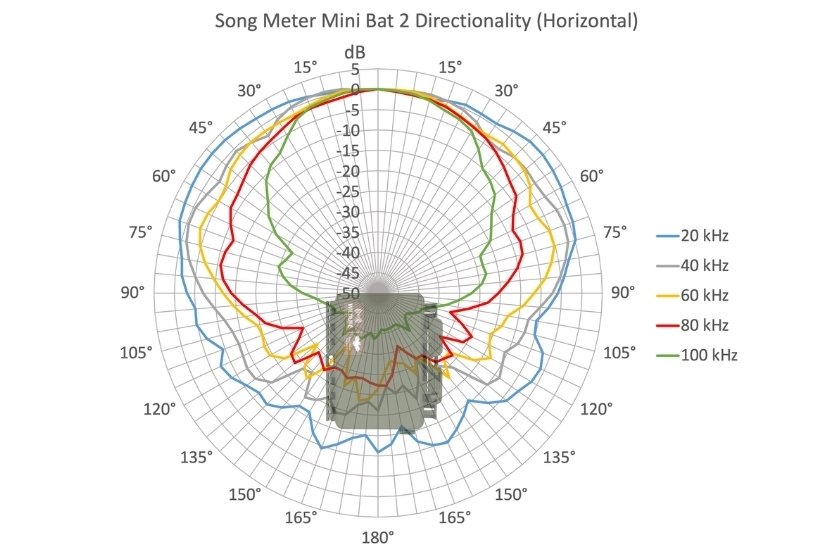
Clutter-Free Zones: Look for at least 15 meters of open space in front of the microphone. An omnidirectional mic captures sound from all directions, but it is most sensitive to what’s directly in front of it, as you can see with these charts:

Clutter can include dense brush, shrubs, and small branches that bats would need to fly through or would alter the shape of their calls.
Pro tip: In a clear area without clutter, bats use “search phase” calls that have a longer duration, providing more identifiable information.
Avoid Echo Sources: Stay away from reflective surfaces, such as the ground, bodies of still water, large walls, rock faces, or nearby trees. When the microphone is very close to a solid surface, sound reflecting off that surface can interfere with incoming sound and create small gaps in the recorded echolocation call, which you want to avoid.
Fastening the recorder to a narrow pole or a similar object is preferable to mounting it directly to a large object, such as a tree trunk.
Species-Specific Considerations: For example, forest-interior bats like Myotis septentrionalis (Northern Long-eared Bat) require that you set detectors under the canopy but above shrubs.
Elevation: Mount detectors at a height of three meters (10 feet) above ground.
Part 2: Selecting Survey Sites
- Labeling: Mark each SD card and associated gear with the detector’s serial number, and keep these together. This will help you track any issues that may come up in the field.
- Update Firmware: Always download the latest version of your recorder’s firmware. Updates can be performed in the field and are essential to ensure that your recorder receives new features and periodic maintenance updates.
Programming: Use your smartphone or tablet and the Song Meter Configurator app to program your recorder’s precise location, date, time, recording schedule, and settings via Bluetooth (no Internet connection required). Here’s a quick video that walks you through how to use the Song Meter Configurator.
Pro tip: Give each recorder a unique name that includes its serial number in the name. This naming convention will help you trace recordings back to their origin.
Deployment Checks: Verify microphone and battery status, calibrate, and document everything. Mini Bat 2 calibration guidelines and this SM4BAT FS calibration video tutorial are available for your convenience. Other recorder models will, of course, have their own guidelines.
Pro tip: Take a screenshot of your result to document that your recorder and the microphone were operating successfully at the time of setup. Do this again at the time of takedown.
- Photographic Evidence: Capture two images per setup: one showing the surrounding habitat and another showing the detector’s placement.
Data Keeping: Document your deployment dates, project name, recorder’s position, location, habitat, equipment used, microphone angle/orientation/height/distance to clutter, and your recording schedule, including sunrise/sunset times, etc.
If you record full-spectrum WAV files, the Mini Bat 2 and SM4BAT FS save much of this info to the metadata of each recording. But, manual record-keeping may be required by the protocol you’re following and provides redundancy
Part 4: Retrieval and Data Management
- Check Status: Before collecting your Mini 2 Bat, use the Song Meter Configurator app to check the status of your recorder and take a screenshot to document. On the SM4BAT FS, press “Check Status” and take a photo of the recorder’s status screen.
- Recalibration: Check the recorder’s microphone function at pickup to verify (and screenshot/document) that it was functioning properly throughout the deployment.
- Card Handling: Keep memory cards matched with their detectors to track performance and troubleshoot issues.
- Data Download: Use high-speed readers to reduce wait times; WAV files can be large.
- Note Archiving: Keep detailed field notes and archive them for future reference or agency requests.
- Housekeeping: It’s tempting to toss your recorders in a closet at the end of the season. Resist this urge! Clean and store your units properly. Remove all memory cards and batteries (the latter can leak corrosive material); clean the equipment if necessary, and store it in a cool, dry place.
